Talk to an Expert (919) 386-4941
Call Us Now (919) 386-4941
Durham Water Damage Pro
Ceiling Stains and Drips: How to Find the Source Before Cosmetic Repairs

Ceiling stains and drips are more than just ugly blemishes — they’re signs that water is getting into your home somewhere it shouldn’t. Covering up a stain with paint without knowing where the water is coming from is like putting a band‑aid on a broken bone: the underlying problem remains and can get worse over time, leading to mold, structural damage, or even ceiling collapse.

Before you reach for paint and a primer, it’s essential to locate and fix the source of the leak. Only then can cosmetic repairs be permanent. Here’s how to troubleshoot ceiling stains and drips step‑by‑step.

Why Ceiling Stains Appear Where They Do — and Why They’re Misleading

Unlike a simple spill, water in a home doesn’t necessarily fall straight down. Inside walls and ceilings, it can travel horizontally or diagonally along pipes, beams, rafters, joists, and insulation before dripping or staining the surface below.

That means the stain on your ceiling is not necessarily directly under the source of moisture — it might be several feet or even yards away. This is one of the key reasons many homeowners misdiagnose ceiling water damage and try repairing cosmetic damage without resolving the leak.

Step‑by‑Step: How to Find the Source Before Repairs

1. Stop the Drip (Safely)

If water is actively dripping:

  • Place a bucket or container underneath to catch water and protect your flooring.
  • Move furniture out of the way and cover items with tarps or plastic sheets.
  • Important: If water is dripping near electrical fixtures (lights, fans), turn off power to the area to reduce shock risk before working near it.

2. Time Your Observation

Look at when the stain gets worse:

  • During or after rain? Likely rooftop, flashing, gutter, or attic issue.
  • Regardless of weather? More likely a plumbing leak or condensation problem.
  • Only when using upstairs bathroom or kitchen? Plumbing fixtures or drain lines could be to blame.

This timing pattern helps you separate external water intrusion problems (like roof leaks) from internal plumbing issues.

3. Check Locations Above the Stain

Use a flashlight and get into the attic or floor above (if accessible):

  • Look for wet insulation, water spots on wood, active drips, or dark patches on structure above the stain.
  • Pay special attention to roof penetrations (vents, chimneys, skylights), plumbing lines, and HVAC ducts — moisture can enter from any of these.

Walking through areas above the stain helps you track where water enters the building envelope or travels before it shows up on the ceiling.

4. Follow the Trail of Moisture

Trace visible wet trails if present:

  • Water often leaves behind darker streaks or discoloration that extend outward.
  • Touch wood beams or pipe surfaces to detect hidden dampness. Follow that path to larger pools of moisture or the actual drip point.

This detective work helps pinpoint the first place water hits before spreading through building materials.

5. Testing Suspected Areas

If the source isn’t obvious:

  • Conduct a controlled water test for roof leaks by gently applying water to small roof sections while someone watches inside for signs of new streaks — but only when conditions are safe and dry.
  • For suspected plumbing, inspect and test upstream pipes (e.g., run showers, flush toilets) while observing above the stain for new moisture drift.
  • Note: Staying safe is key — don’t perform roofs tests during storms or on unsafe surfaces, and turn off power before working near plumbing or electrical systems.

6. Use Diagnostic Tools if Needed

If the leak is hard to find or sporadic:

  • Moisture meters can measure hidden dampness behind drywall.
  • Thermal imaging cameras reveal cooler, wetter areas behind surfaces without unnecessary cutting. 

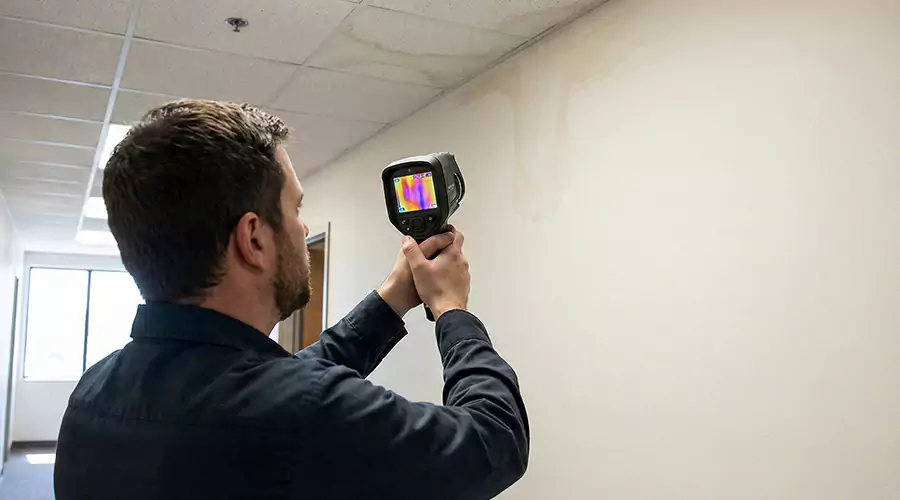
    For effective Leaking Ceiling Repair, these tools help pinpoint problem areas early.

  • Some professionals use ultrasonic detectors or endoscopic cameras to locate leaks inside walls without large openings.

These tools help non‑destructively map moisture patterns, saving time and repair cost.

Common Leak Sources to Investigate

  • Roof and Attic Issues - Rain, wind‑driven moisture, failing flashing, missing shingles, or clogged gutters can lead to water entry even before ceiling stains appear.
  • Plumbing Failures - Pipes running above the ceiling, bathroom drains, loose fittings, or dishwasher/washing machine lines in upper floors can cause hidden leaks.
  • HVAC Condensation - Clogged drain pans or HVAC units in the attic can produce moisture that drips into living spaces below.
  • Condensation - In bathrooms or poorly ventilated spaces, steam and humidity can condense on cold surfaces, eventually showing up as stains.

Why You Must Fix the Source Before Cosmetic Repairs

Simply painting over a stain:

  • Doesn’t stop ongoing water entry — stains will reappear.
  • Masks early warning signs of structural rot or mold.
  • Can lead to worse damage, like warped drywall or bulging ceiling sections.

By finding and fixing the source first, you prevent recurring damage and reduce the risk of hidden health hazards like mold inside the ceiling cavity.

Final Thoughts

Ceiling stains are often just the tip of the iceberg when it comes to water damage. The leak source may be remote from the visible spot — traveling along pipes, roof structures, or insulation before appearing below. Taking time to trace moisture back to its entry point (through visual inspection, tracking patterns, timing observations, attic checks, and diagnostic tools) prevents recurring issues and costly repairs. Once the leak is fixed and everything is dry, then you’re ready for cosmetic repairs that stay fixed.

Need Immediate Help?

Our certified experts are ready 24/7 to assist you with emergency restoration services.

GET A QUOTE
4.9 / 5.0
Trusted by 618 Clients